Pav – Indian Dinner Buns

Danes take great pride in the variety of breads and Danish pastries they have to offer and I will not deny that. I love them all. 🙂 But what I really really miss inspite of all the options is the soft bread bun called ‘Pav’ from India. The closest bun, I have eaten here is the Hvedeknopper, which is a white bread roll but it is spiced with cardamom. So I tried baking this at home and it turned out awesome! I know I know! You lucky ones out there in India can just buy it from your next door baker. But trust me there is a sense of achievement and pride when you make these soft home-baked bread. So do give it a shot. 🙂
For my international friends, Pav or Indian Dinner Buns is a very versatile bun and used as a key accompaniment to a number of popular fast food dishes like Pav Bhaji, Vada Pav, Misal Pav, Masala Pav etc… The list goes on. I will post a recipe on the Pav Bhaji soon after – but the bhaji (mix veg curry) is incomplete without its Pav. So I start with the basics here.
This recipe is fool proof and will give you the most pillowy and soft bread with a crusty top. Wait, it gets better – it is eggless. 🙂 When I tried this recipe for the first time – I knew this was a keeper for life and tastes exactly like the ones you get at an Indian baker. Remember to follow instructions to the T.

Makes 12 Pav / Buns
INGREDIENTS:
2 cups or 250 g All-purpose flour or wheat flour
¾ cup or 190 ml Milk
1 tsp or 5 gms Salt
4 tsp or 20 gms Butter, at room temperature
2 tsp or 8 gms Instant Yeast
1 tbsp or 15 gms Sugar
1½ tbsp Milk, for brushing
1½ tbsp Butter, melted for brushing
Oil – for greasing
INSTRUCTIONS:
- Warm the milk to 43 degrees or 110F. Remember, the temperature of your liquid is key to success in baking! Do not overheat else it will kill the yeast. If you don’t own a food thermometer, warm the liquid to a lukewarm temperature, aiming low.
- Add the sugar and yeast. Stir well and set it aside to bloom for 10 minutes.
- Mix the flour and salt in a bowl.
- After 10 minutes, the yeast mixture should look frothy.
- Add it to the flour and combine to make dough either by hand or a stand mixer with dough hook. A food processor with a dough attachment will do good too.
- The dough at this point will seem extremely sticky. DO NOT to add more flour or oil to the dough. It will come together once it has been kneaded. This tip is extremely important to get soft buns. Trust me here!
- Add the butter to the dough and knead until it all comes together and no longer sticky. If you are using your hands it will take approx. 12 to 15 minutes of kneading to reaching this stage. Be ready for some exercise but you cannot skip this step. Therefore it is much easier to do this with dough attachment.
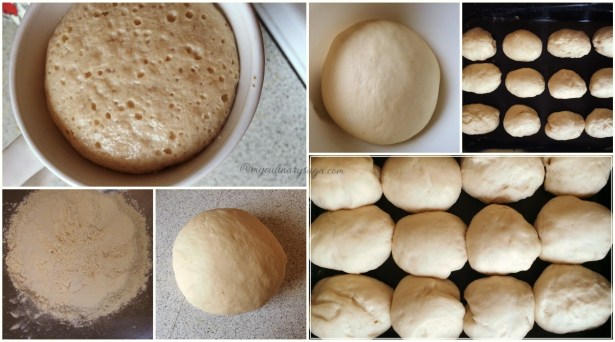
- Now cover the dough and keep aside for 45 mins to one hour in a warm place.
- Depending on your room temperature, approx. after an hour the dough will double in volume.
- Grease a square or rectangular cake tin with oil or butter
- Dust your hands with some flour and punch the dough down.
- Knead for a minute. Add very little flour to the counter just to ensure that the dough doesn’t stick.
- Divide the dough into 12 equal portions, about 41 grams each.
- Roll the dough between your palms or on the counter in circular motion.
- Arrange the shaped dough portions in the greased tin, very close, leaving a finger’s gap between each. This will ensure that after the second rise, it rises up rather than sideways.
- Cover the tin with damp tea towel and keep aside in a warm place for another 40-45 mins to proof.
- When you are 35 mins into the proofing time – Preheat your oven to 180C for 10 minutes.
- After 45 minutes, brush the risen dough gently with milk.
- Bake for 15 minutes at 180 C. Bake them for little longer if it doesn’t brown within 15 minutes but not more than 18 minutes.
- You will know that your buns are ready when they are risen and browned on the top.
- Remove from the oven and immediately and brush the top with melted butter to give it some shine.
- Enjoy these warm slathered with butter. 🙂

I will update a few recipes that you can enjoy these ‘Pav’s’ with 🙂 Until then get baking.
And don’t forget to send me a snapshot of your creation; I would love to include it in the Reader’s testimonial Album on my facebook page.
Do visit my Facebook page My Culinary Saga and Like the page to get regular yummy updates & on Pinterest: My Culinary Saga.
Love & Hugs,
Trupti
Trupti, you make me so happy 🙂 . These dinner buns, look delicious. I told myself, at the beginning of the year, that one thing I had to do, was to make bread this year….so these look amazing and am going to try them, soon. Thank you so much for all the lovely clear instructions. Have a wonderful weekend x
It makes me so happy to hear this from you Lynne 🙂 baking bread at home is really soul satisfying! Happy baking dear.. good weekend to you too !
🙂
I’ve made the bhaji but never the pav…yours look perfect!
Thank you so much Elaine 😋😍
Your buns or rolls are just wonderful. There is almost nothing better than hot/warm bread and your rollos look delicous,
So true! Thank you so much !! ☺️ yours look soooo good too 🙂
This is perfect!
Thanks dear 🙂 love how soft and cushiony they turn out
These are so lovely Trupti xx
Thank you so much Lynn! Hope you are enjoying your weekend
Thanks you too
Reblogged this on MAXIMUSOPTIMUSDOMINUS.
alrightttt.. I’m loving the fact that you shared one of your tried and tested recipes. It’s so hard to get the right kind of flavor if you don’t have the right kind of bread and I completely understand your struggle with craving for a certain bread outside of your country, happened to me when I was visiting Australia:)
Hehee 🙂 so you share exactly what I feel ! Thank you so much for understanding!
Hehe, love .
❤️
Hey! These pavs look awesome. Bring some for me when you visit. Love your dedication to food and to blogging. <3
thanks Vibha 🙂 I have enjoyed this so much more than I imagined.. Hope you are doing well! Hope we can meet soon.. been ages and so much to talk…
Enjoying yourself is the key to success in any creative pursuit. It is the reason for you to have built a strong following. Wish you many milestones on this happy journey.
Thank you Vibha 🙂 <3